> ## Documentation Index
> Fetch the complete documentation index at: https://cometchat-22654f5b-docs-angular-v5-docs-update.mintlify.site/llms.txt
> Use this file to discover all available pages before exploring further.
# One-to-One / Group Chat
> Build focused CometChat iOS UI Kit one-to-one or group chat screens with headers, message lists, composers, and direct chat navigation.
| Field | Value |
| ------------ | ---------------------------------------------------------------------------- |
| Package | `CometChatUIKitSwift` |
| Framework | UIKit / SwiftUI |
| Components | `CometChatMessageHeader`, `CometChatMessageList`, `CometChatMessageComposer` |
| Layout | Single chat window — no sidebar, no conversation list |
| Prerequisite | Complete [iOS Integration](/ui-kit/ios/getting-started) Steps 1–4 first |
| Pattern | Support chat, embedded widgets, focused messaging |
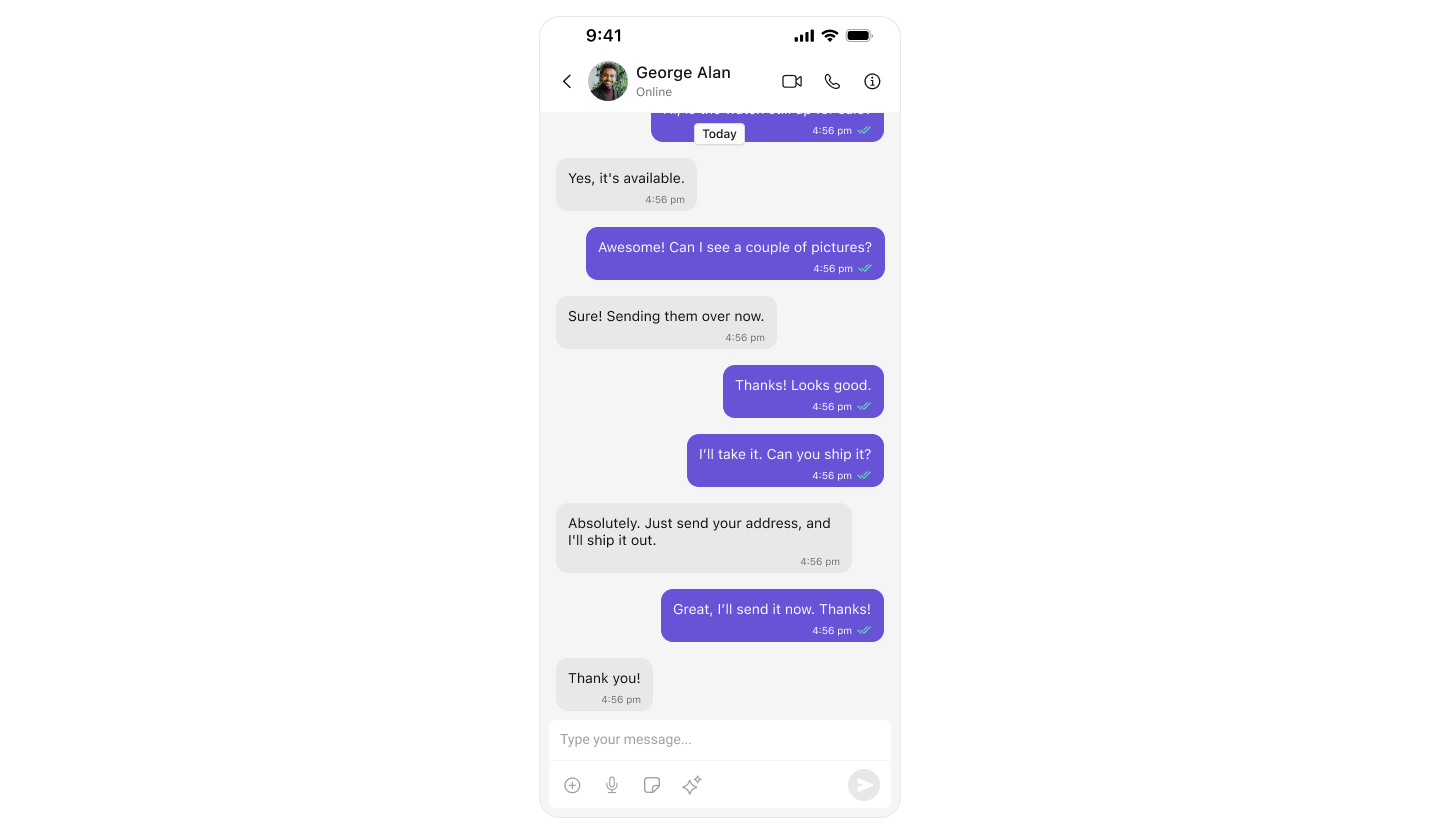
This guide builds a single chat window — no sidebar, no conversation list. Users go directly into a one-to-one or group chat. Good for support chat, contextual messaging, or any focused messaging experience.
This assumes you've already completed [iOS Integration](/ui-kit/ios/getting-started) (project created, UI Kit installed, init + login working, permissions configured).
 ***
## What You're Building
Three components stacked vertically:
1. **Chat header** — displays recipient name, avatar, online status, and optional call buttons
2. **Message list** — real-time chat history with scrolling
3. **Message composer** — text input with media, emojis, and reactions
***
## Step 1 — Setup SceneDelegate
Fetch the user (or group) after login and launch directly into the messages view.
```swift title="SceneDelegate.swift" highlight={13-15,34} lines theme={null}
import UIKit
import CometChatUIKitSwift
import CometChatSDK
class SceneDelegate: UIResponder, UIWindowSceneDelegate {
var window: UIWindow?
func scene(_ scene: UIScene, willConnectTo session: UISceneSession, options connectionOptions: UIScene.ConnectionOptions) {
guard let windowScene = (scene as? UIWindowScene) else { return }
let uikitSettings = UIKitSettings()
.set(appID: "APP_ID") // Replace with your App ID
.set(region: "REGION") // Replace with your Region
.set(authKey: "AUTH_KEY") // Replace with your Auth Key (dev only)
.subscribePresenceForAllUsers()
.build()
CometChatUIKit.init(uiKitSettings: uikitSettings) { result in
switch result {
case .success:
debugPrint("CometChat initialized")
let uid = "cometchat-uid-1"
CometChatUIKit.login(uid: uid) { loginResult in
switch loginResult {
case .success:
debugPrint("Login successful")
DispatchQueue.main.async { [weak self] in
self?.setUpOneOneOrGroupConversation(
windowScene: windowScene,
uid: "cometchat-uid-2" // The user to chat with
)
}
case .onError(let error):
debugPrint("Login failed: \(error.description)")
@unknown default: break
}
}
case .failure(let error):
debugPrint("Init failed: \(error.localizedDescription)")
}
}
}
func setUpOneOneOrGroupConversation(windowScene: UIWindowScene, uid: String) {
CometChat.getUser(UID: uid) { user in
DispatchQueue.main.async {
let messagesVC = MessagesVC()
messagesVC.user = user
let navController = UINavigationController(rootViewController: messagesVC)
self.window = UIWindow(windowScene: windowScene)
self.window?.rootViewController = navController
self.window?.makeKeyAndVisible()
}
} onError: { error in
debugPrint("Failed to fetch user: \(error?.description ?? "")")
}
}
}
```
Key points:
* `CometChat.getUser(UID:)` fetches the user object from the SDK — you need a real user object, not a manually constructed one.
* The highlighted lines show where to set the credentials and the UID of the user to chat with.
***
## Switching Between User and Group Chat
To load a group chat instead of one-to-one, replace `getUser` with `getGroup`:
```swift highlight={2} lines theme={null}
func setUpGroupConversation(windowScene: UIWindowScene, guid: String) {
CometChat.getGroup(GUID: guid) { group in
DispatchQueue.main.async {
let messagesVC = MessagesVC()
messagesVC.group = group
let navController = UINavigationController(rootViewController: messagesVC)
self.window = UIWindow(windowScene: windowScene)
self.window?.rootViewController = navController
self.window?.makeKeyAndVisible()
}
} onError: { error in
debugPrint("Failed to fetch group: \(error?.description ?? "")")
}
}
```
***
## Step 2 — Create MessagesVC
Create a new Swift file for the messages view controller:
1. In Xcode, right-click your project folder in the Navigator
2. Select **New File...**
3. Choose **Swift File** and click Next
4. Name it `MessagesVC.swift` and click Create
Add the following code. This view controller assembles the header, message list, and composer.
```swift title="MessagesVC.swift" lines theme={null}
import UIKit
import CometChatSDK
import CometChatUIKitSwift
class MessagesVC: UIViewController {
// MARK: - Properties
var user: User?
var group: Group?
// MARK: - UI Components
private lazy var headerView: CometChatMessageHeader = {
let view = CometChatMessageHeader()
view.translatesAutoresizingMaskIntoConstraints = false
if let user = user {
view.set(user: user)
} else if let group = group {
view.set(group: group)
}
view.set(controller: self)
return view
}()
private lazy var messageListView: CometChatMessageList = {
let listView = CometChatMessageList()
listView.translatesAutoresizingMaskIntoConstraints = false
if let user = user {
listView.set(user: user)
} else if let group = group {
listView.set(group: group)
}
listView.set(controller: self)
return listView
}()
private lazy var composerView: CometChatMessageComposer = {
let composer = CometChatMessageComposer()
composer.translatesAutoresizingMaskIntoConstraints = false
if let user = user {
composer.set(user: user)
} else if let group = group {
composer.set(group: group)
}
composer.set(controller: self)
return composer
}()
// MARK: - Lifecycle
override func viewDidLoad() {
super.viewDidLoad()
configureView()
setupLayout()
}
override func viewWillDisappear(_ animated: Bool) {
super.viewWillDisappear(animated)
navigationController?.setNavigationBarHidden(false, animated: true)
}
// MARK: - Setup
private func configureView() {
view.backgroundColor = .systemBackground
navigationController?.setNavigationBarHidden(true, animated: false)
}
private func setupLayout() {
[headerView, messageListView, composerView].forEach { view.addSubview($0) }
NSLayoutConstraint.activate([
// Header
headerView.topAnchor.constraint(equalTo: view.safeAreaLayoutGuide.topAnchor),
headerView.leadingAnchor.constraint(equalTo: view.leadingAnchor),
headerView.trailingAnchor.constraint(equalTo: view.trailingAnchor),
headerView.heightAnchor.constraint(equalToConstant: 50),
// Message list
messageListView.topAnchor.constraint(equalTo: headerView.bottomAnchor),
messageListView.leadingAnchor.constraint(equalTo: view.leadingAnchor),
messageListView.trailingAnchor.constraint(equalTo: view.trailingAnchor),
messageListView.bottomAnchor.constraint(equalTo: composerView.topAnchor),
// Composer
composerView.leadingAnchor.constraint(equalTo: view.leadingAnchor),
composerView.trailingAnchor.constraint(equalTo: view.trailingAnchor),
composerView.bottomAnchor.constraint(equalTo: view.safeAreaLayoutGuide.bottomAnchor)
])
}
}
```
How it works:
* `CometChatMessageHeader` shows user/group info and back button
* `CometChatMessageList` displays messages with real-time updates
* `CometChatMessageComposer` handles text input, media, and reactions
* Pass either `user` or `group` to each component, never both
***
## Step 3 — Run the Project
Build and run in Xcode. You should see the chat window load directly with the conversation for the UID you set.
***
## Next Steps
Customize colors, fonts, and styles to match your brand
Browse all prebuilt UI components
Back to the main setup guide
Chat features included out of the box
***
## What You're Building
Three components stacked vertically:
1. **Chat header** — displays recipient name, avatar, online status, and optional call buttons
2. **Message list** — real-time chat history with scrolling
3. **Message composer** — text input with media, emojis, and reactions
***
## Step 1 — Setup SceneDelegate
Fetch the user (or group) after login and launch directly into the messages view.
```swift title="SceneDelegate.swift" highlight={13-15,34} lines theme={null}
import UIKit
import CometChatUIKitSwift
import CometChatSDK
class SceneDelegate: UIResponder, UIWindowSceneDelegate {
var window: UIWindow?
func scene(_ scene: UIScene, willConnectTo session: UISceneSession, options connectionOptions: UIScene.ConnectionOptions) {
guard let windowScene = (scene as? UIWindowScene) else { return }
let uikitSettings = UIKitSettings()
.set(appID: "APP_ID") // Replace with your App ID
.set(region: "REGION") // Replace with your Region
.set(authKey: "AUTH_KEY") // Replace with your Auth Key (dev only)
.subscribePresenceForAllUsers()
.build()
CometChatUIKit.init(uiKitSettings: uikitSettings) { result in
switch result {
case .success:
debugPrint("CometChat initialized")
let uid = "cometchat-uid-1"
CometChatUIKit.login(uid: uid) { loginResult in
switch loginResult {
case .success:
debugPrint("Login successful")
DispatchQueue.main.async { [weak self] in
self?.setUpOneOneOrGroupConversation(
windowScene: windowScene,
uid: "cometchat-uid-2" // The user to chat with
)
}
case .onError(let error):
debugPrint("Login failed: \(error.description)")
@unknown default: break
}
}
case .failure(let error):
debugPrint("Init failed: \(error.localizedDescription)")
}
}
}
func setUpOneOneOrGroupConversation(windowScene: UIWindowScene, uid: String) {
CometChat.getUser(UID: uid) { user in
DispatchQueue.main.async {
let messagesVC = MessagesVC()
messagesVC.user = user
let navController = UINavigationController(rootViewController: messagesVC)
self.window = UIWindow(windowScene: windowScene)
self.window?.rootViewController = navController
self.window?.makeKeyAndVisible()
}
} onError: { error in
debugPrint("Failed to fetch user: \(error?.description ?? "")")
}
}
}
```
Key points:
* `CometChat.getUser(UID:)` fetches the user object from the SDK — you need a real user object, not a manually constructed one.
* The highlighted lines show where to set the credentials and the UID of the user to chat with.
***
## Switching Between User and Group Chat
To load a group chat instead of one-to-one, replace `getUser` with `getGroup`:
```swift highlight={2} lines theme={null}
func setUpGroupConversation(windowScene: UIWindowScene, guid: String) {
CometChat.getGroup(GUID: guid) { group in
DispatchQueue.main.async {
let messagesVC = MessagesVC()
messagesVC.group = group
let navController = UINavigationController(rootViewController: messagesVC)
self.window = UIWindow(windowScene: windowScene)
self.window?.rootViewController = navController
self.window?.makeKeyAndVisible()
}
} onError: { error in
debugPrint("Failed to fetch group: \(error?.description ?? "")")
}
}
```
***
## Step 2 — Create MessagesVC
Create a new Swift file for the messages view controller:
1. In Xcode, right-click your project folder in the Navigator
2. Select **New File...**
3. Choose **Swift File** and click Next
4. Name it `MessagesVC.swift` and click Create
Add the following code. This view controller assembles the header, message list, and composer.
```swift title="MessagesVC.swift" lines theme={null}
import UIKit
import CometChatSDK
import CometChatUIKitSwift
class MessagesVC: UIViewController {
// MARK: - Properties
var user: User?
var group: Group?
// MARK: - UI Components
private lazy var headerView: CometChatMessageHeader = {
let view = CometChatMessageHeader()
view.translatesAutoresizingMaskIntoConstraints = false
if let user = user {
view.set(user: user)
} else if let group = group {
view.set(group: group)
}
view.set(controller: self)
return view
}()
private lazy var messageListView: CometChatMessageList = {
let listView = CometChatMessageList()
listView.translatesAutoresizingMaskIntoConstraints = false
if let user = user {
listView.set(user: user)
} else if let group = group {
listView.set(group: group)
}
listView.set(controller: self)
return listView
}()
private lazy var composerView: CometChatMessageComposer = {
let composer = CometChatMessageComposer()
composer.translatesAutoresizingMaskIntoConstraints = false
if let user = user {
composer.set(user: user)
} else if let group = group {
composer.set(group: group)
}
composer.set(controller: self)
return composer
}()
// MARK: - Lifecycle
override func viewDidLoad() {
super.viewDidLoad()
configureView()
setupLayout()
}
override func viewWillDisappear(_ animated: Bool) {
super.viewWillDisappear(animated)
navigationController?.setNavigationBarHidden(false, animated: true)
}
// MARK: - Setup
private func configureView() {
view.backgroundColor = .systemBackground
navigationController?.setNavigationBarHidden(true, animated: false)
}
private func setupLayout() {
[headerView, messageListView, composerView].forEach { view.addSubview($0) }
NSLayoutConstraint.activate([
// Header
headerView.topAnchor.constraint(equalTo: view.safeAreaLayoutGuide.topAnchor),
headerView.leadingAnchor.constraint(equalTo: view.leadingAnchor),
headerView.trailingAnchor.constraint(equalTo: view.trailingAnchor),
headerView.heightAnchor.constraint(equalToConstant: 50),
// Message list
messageListView.topAnchor.constraint(equalTo: headerView.bottomAnchor),
messageListView.leadingAnchor.constraint(equalTo: view.leadingAnchor),
messageListView.trailingAnchor.constraint(equalTo: view.trailingAnchor),
messageListView.bottomAnchor.constraint(equalTo: composerView.topAnchor),
// Composer
composerView.leadingAnchor.constraint(equalTo: view.leadingAnchor),
composerView.trailingAnchor.constraint(equalTo: view.trailingAnchor),
composerView.bottomAnchor.constraint(equalTo: view.safeAreaLayoutGuide.bottomAnchor)
])
}
}
```
How it works:
* `CometChatMessageHeader` shows user/group info and back button
* `CometChatMessageList` displays messages with real-time updates
* `CometChatMessageComposer` handles text input, media, and reactions
* Pass either `user` or `group` to each component, never both
***
## Step 3 — Run the Project
Build and run in Xcode. You should see the chat window load directly with the conversation for the UID you set.
***
## Next Steps
Customize colors, fonts, and styles to match your brand
Browse all prebuilt UI components
Back to the main setup guide
Chat features included out of the box