> ## Documentation Index
> Fetch the complete documentation index at: https://cometchat-22654f5b-docs-angular-v5-docs-update.mintlify.site/llms.txt
> Use this file to discover all available pages before exploring further.
# Marking Delivered From Push Notification
> Guide to marking messages as delivered using push notification payload with Notification Service Extension.
* **Requires:** UNNotificationServiceExtension target in your app
* **Purpose:** Mark messages delivered even when app is in background/terminated
* **Implementation:** Call `CometChat.markAsDelivered()` in notification extension
* **Parse payload:** Extract message ID, sender ID, receiver type from notification
* **Related:** [Delivery & Read Receipts](/sdk/ios/delivery-read-receipts) · [Push Notifications](/notifications/push-overview)
Implementing the capability to mark a message as "delivered" through a push notification payload confirms to the sender that their message has reached its intended recipient, enhancing the overall user experience.
Setting up Mark as delivered from push notification in iOS requires a Notification extension in your app project.
If you already have a Notification extension on your project then you can skip the first part of creating a new extension and use the one you have.
### Setting up Notification extension
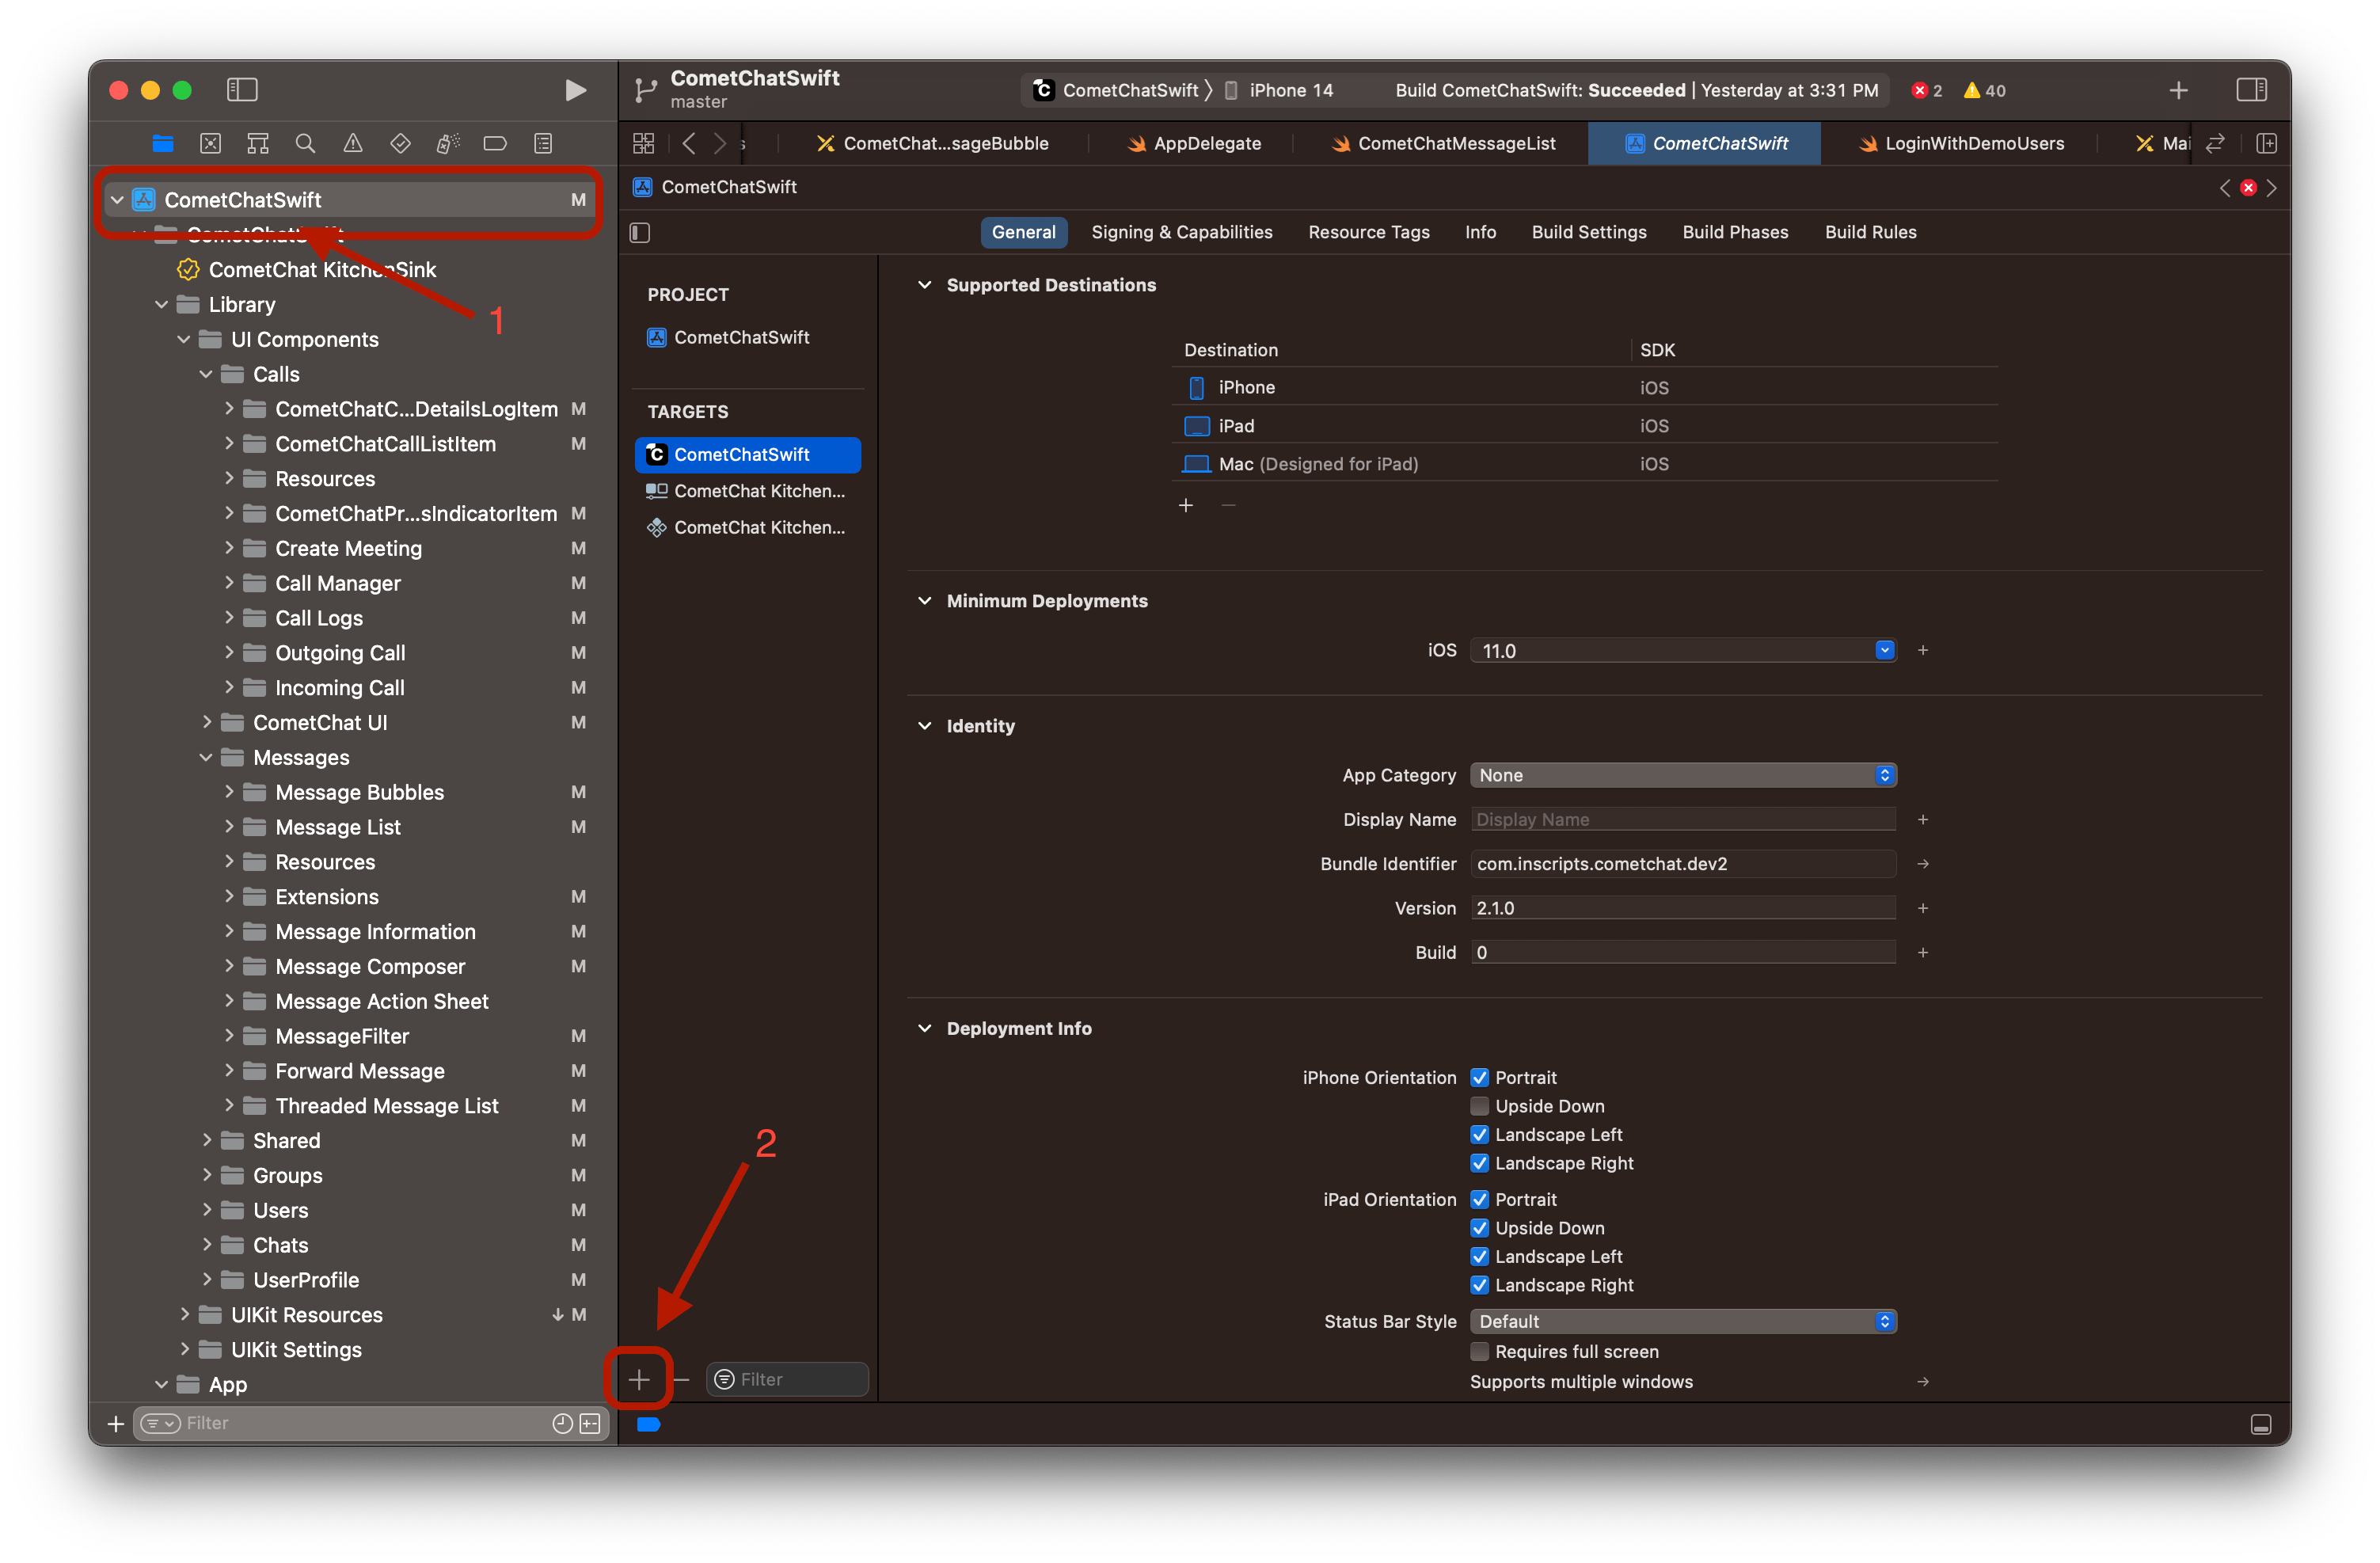
1. Navigate to your project's target section and click on the plus iOS
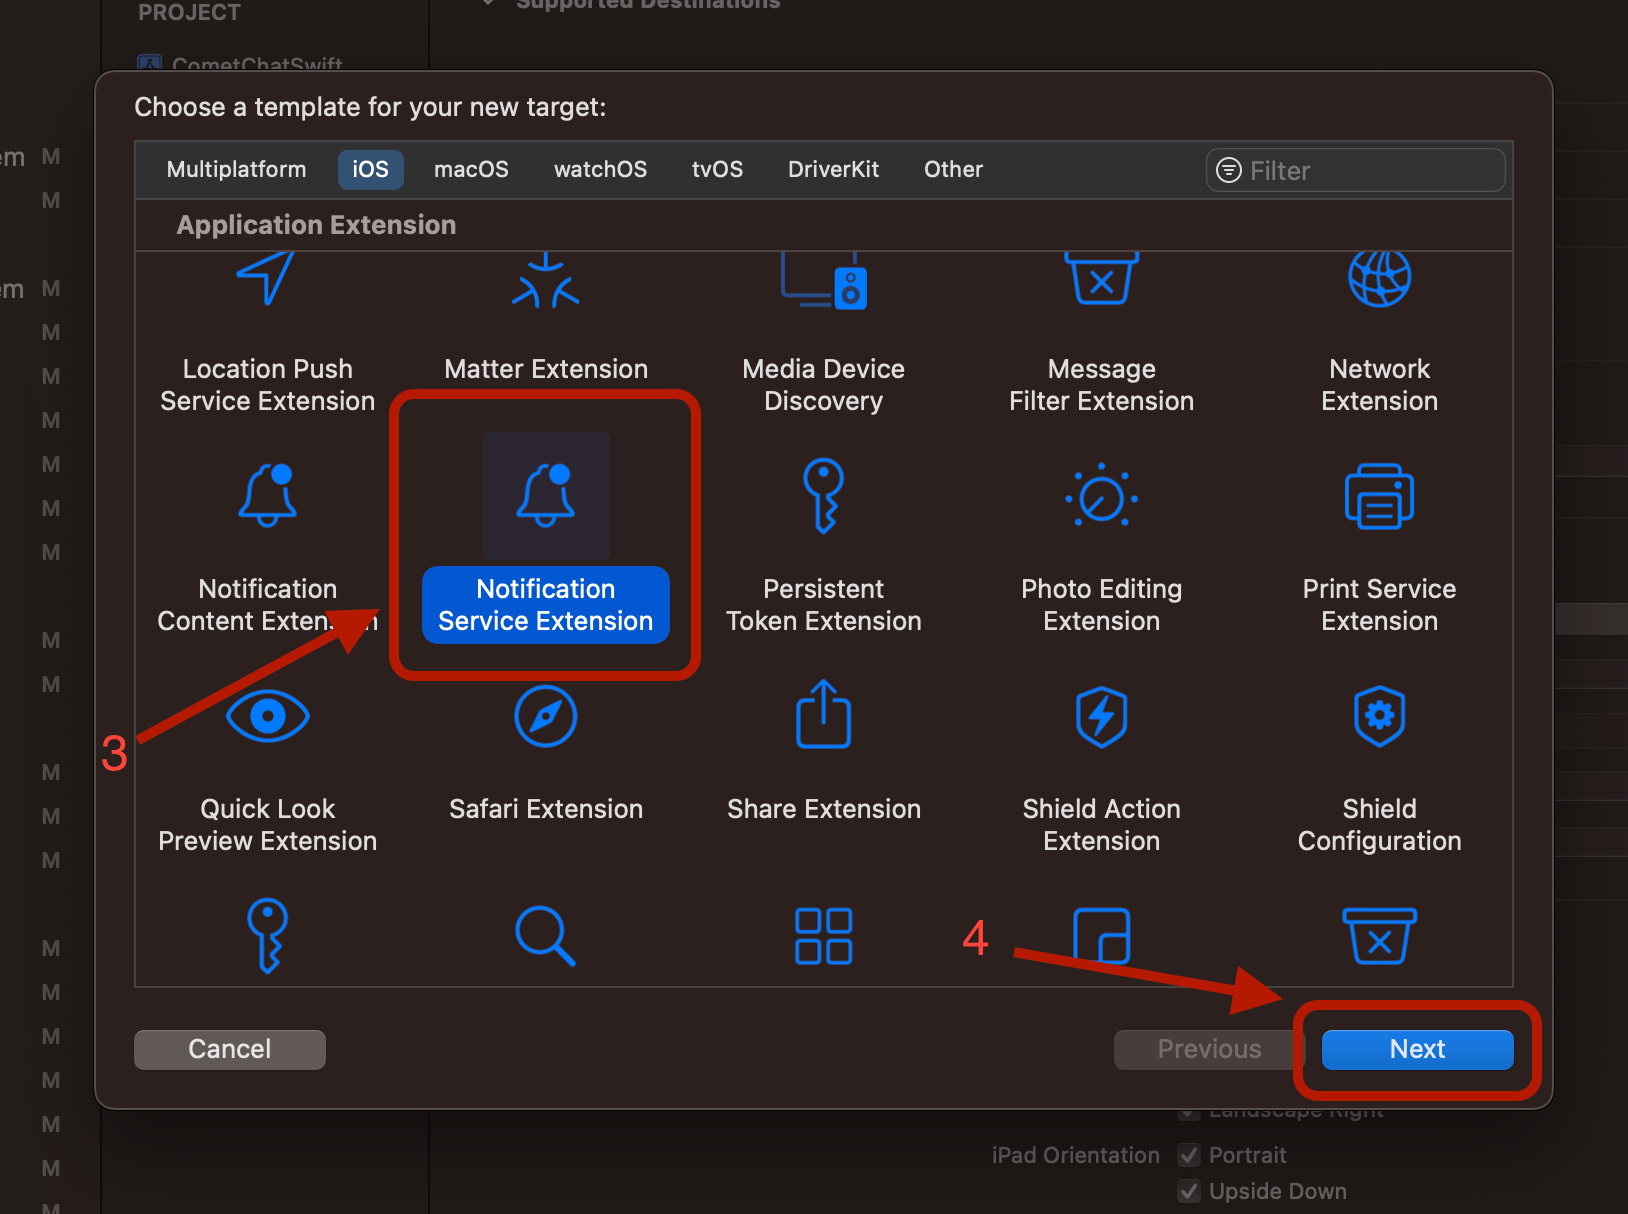
 2. Then Scroll down, select Notification Service Extension and click on the next.
 3. Give it a name and click finish
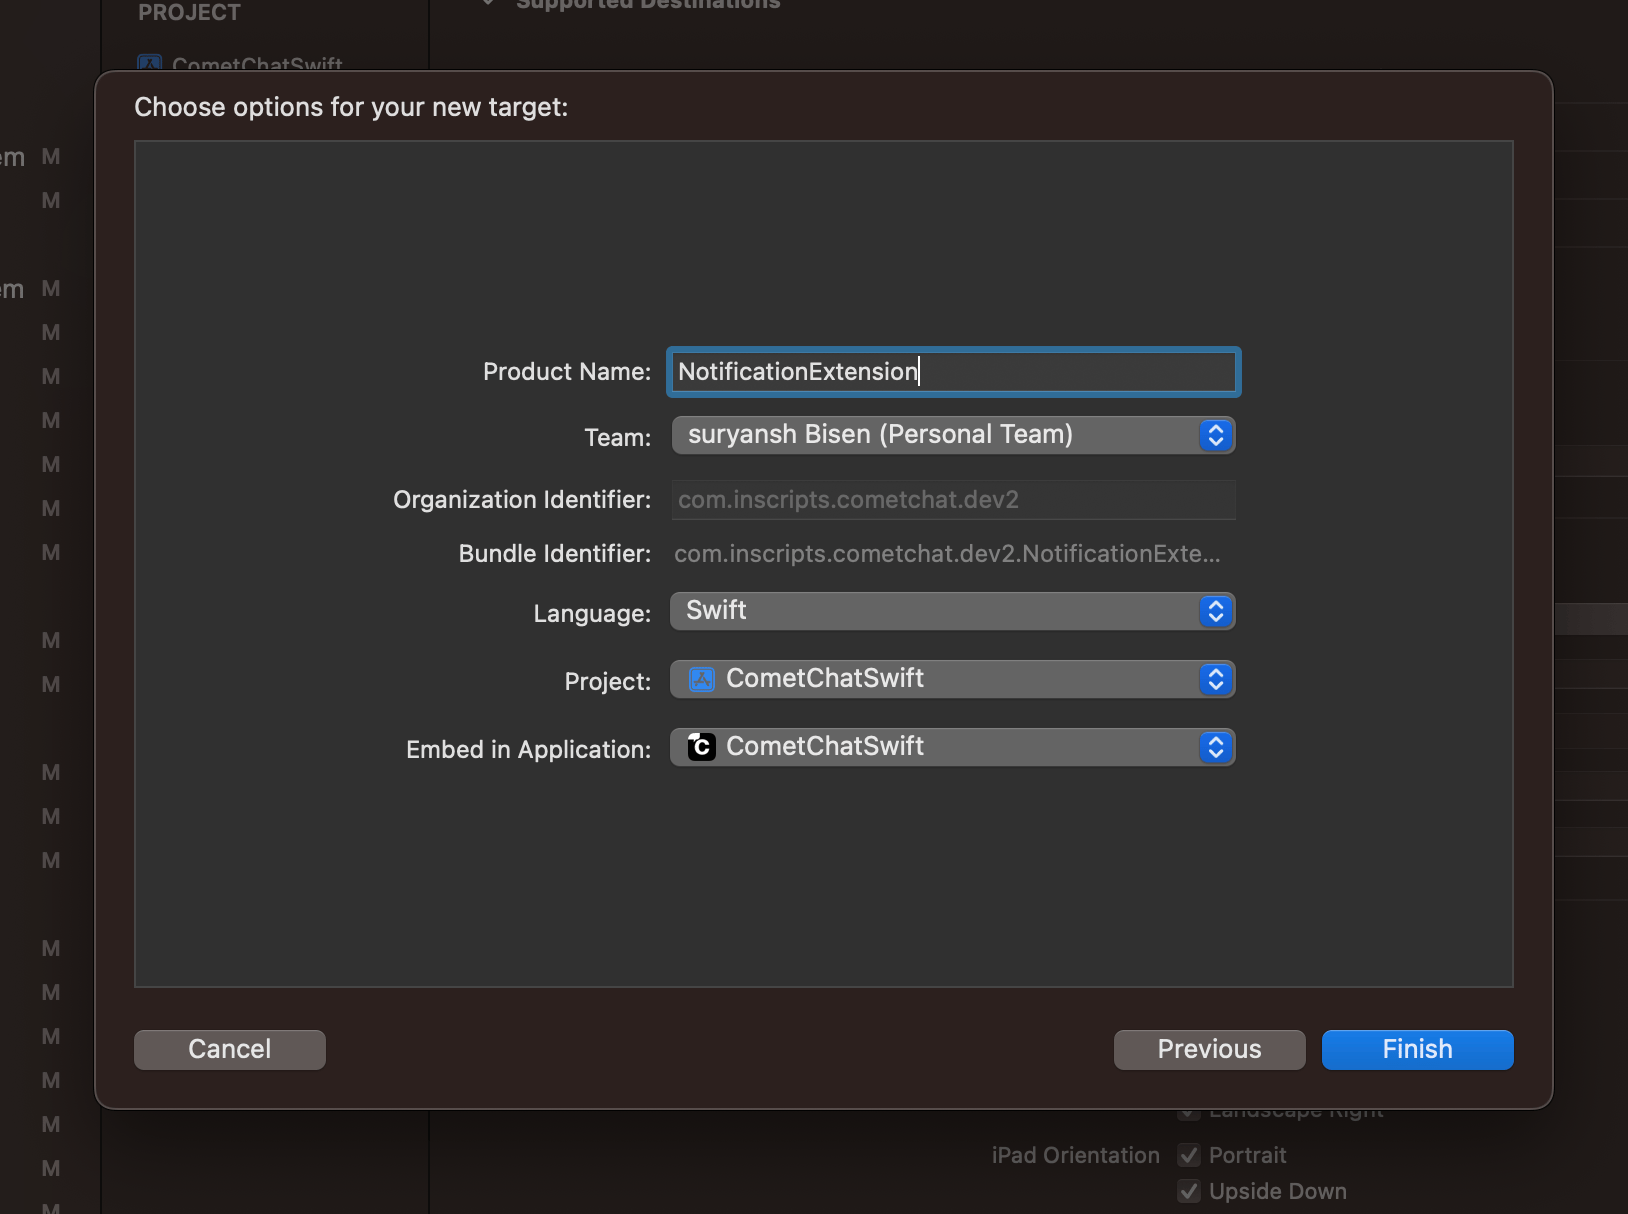 * Your notification service extension is ready now, you can see that in the target list. Now we will create app group for the extension. This app group will be needed to share user default between the main application and notification service extension.
4. Click on the notification service extension name on the target list, then select Signing & Capabilities, then click on "+ Capability" from the top. Make sure All is selected besides it.
* Your notification service extension is ready now, you can see that in the target list. Now we will create app group for the extension. This app group will be needed to share user default between the main application and notification service extension.
4. Click on the notification service extension name on the target list, then select Signing & Capabilities, then click on "+ Capability" from the top. Make sure All is selected besides it.
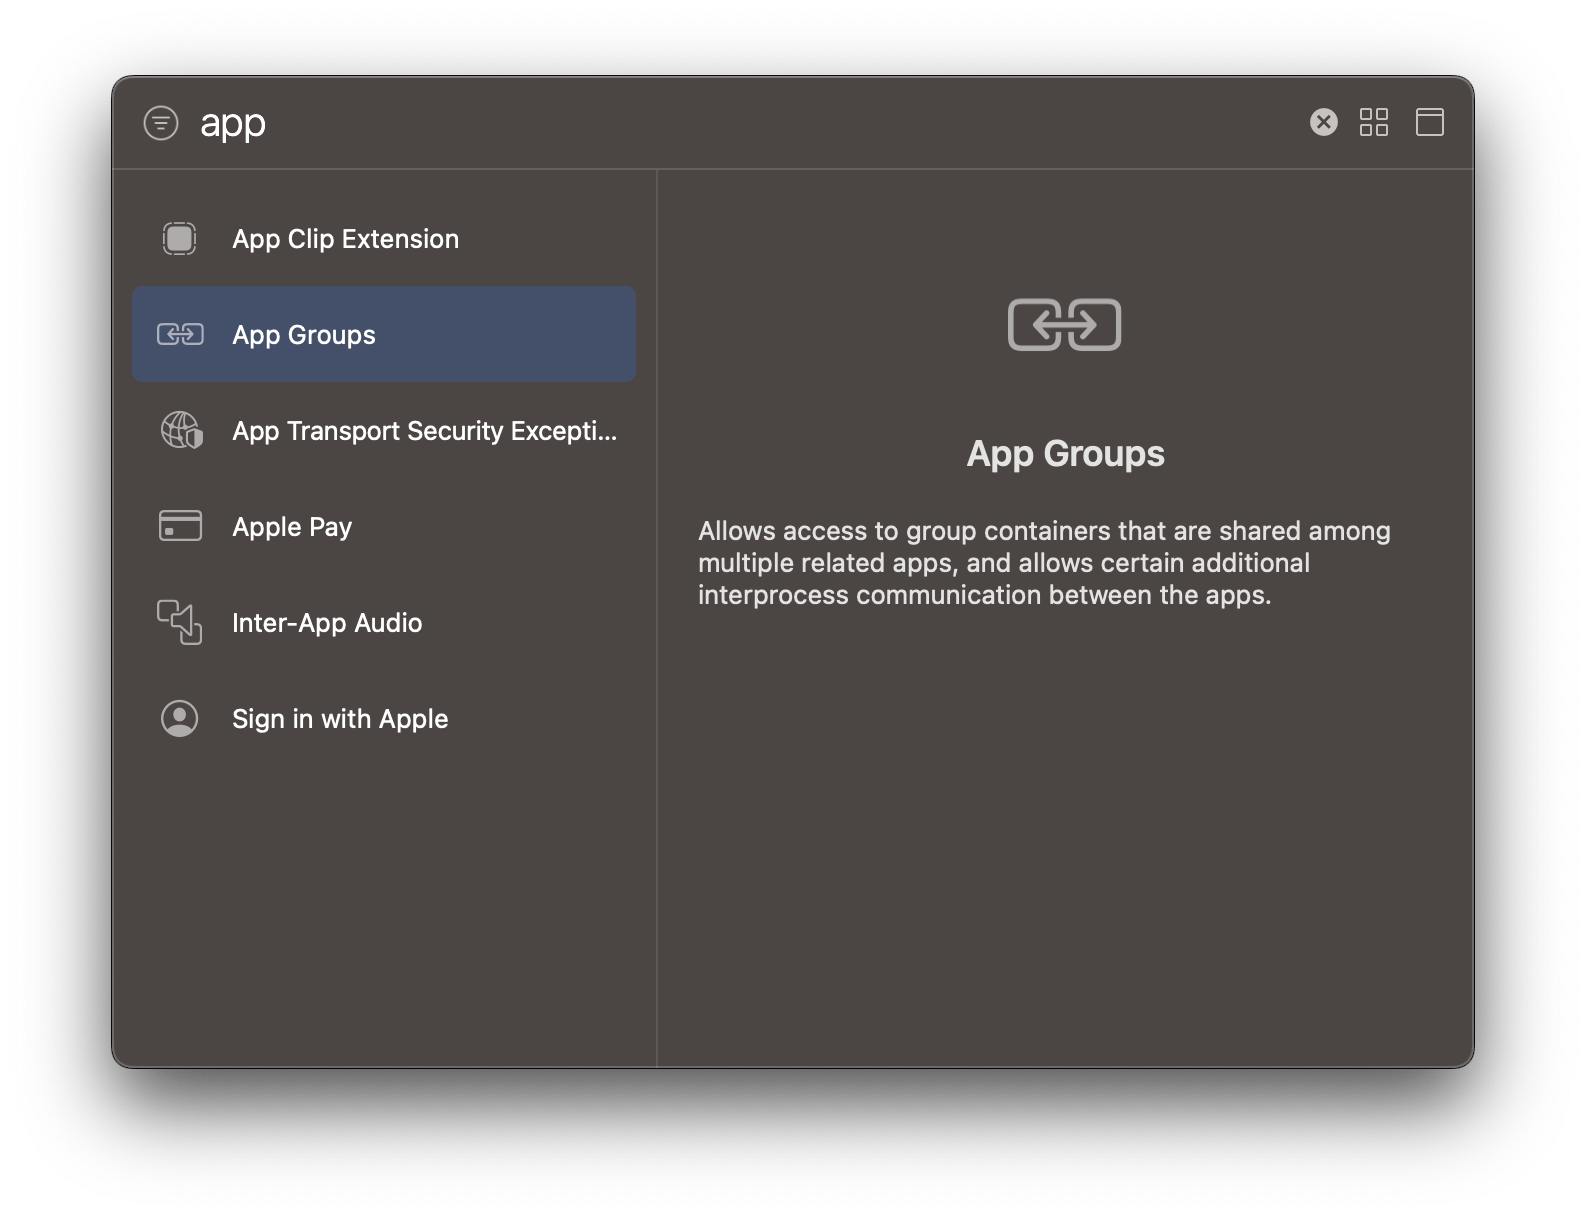
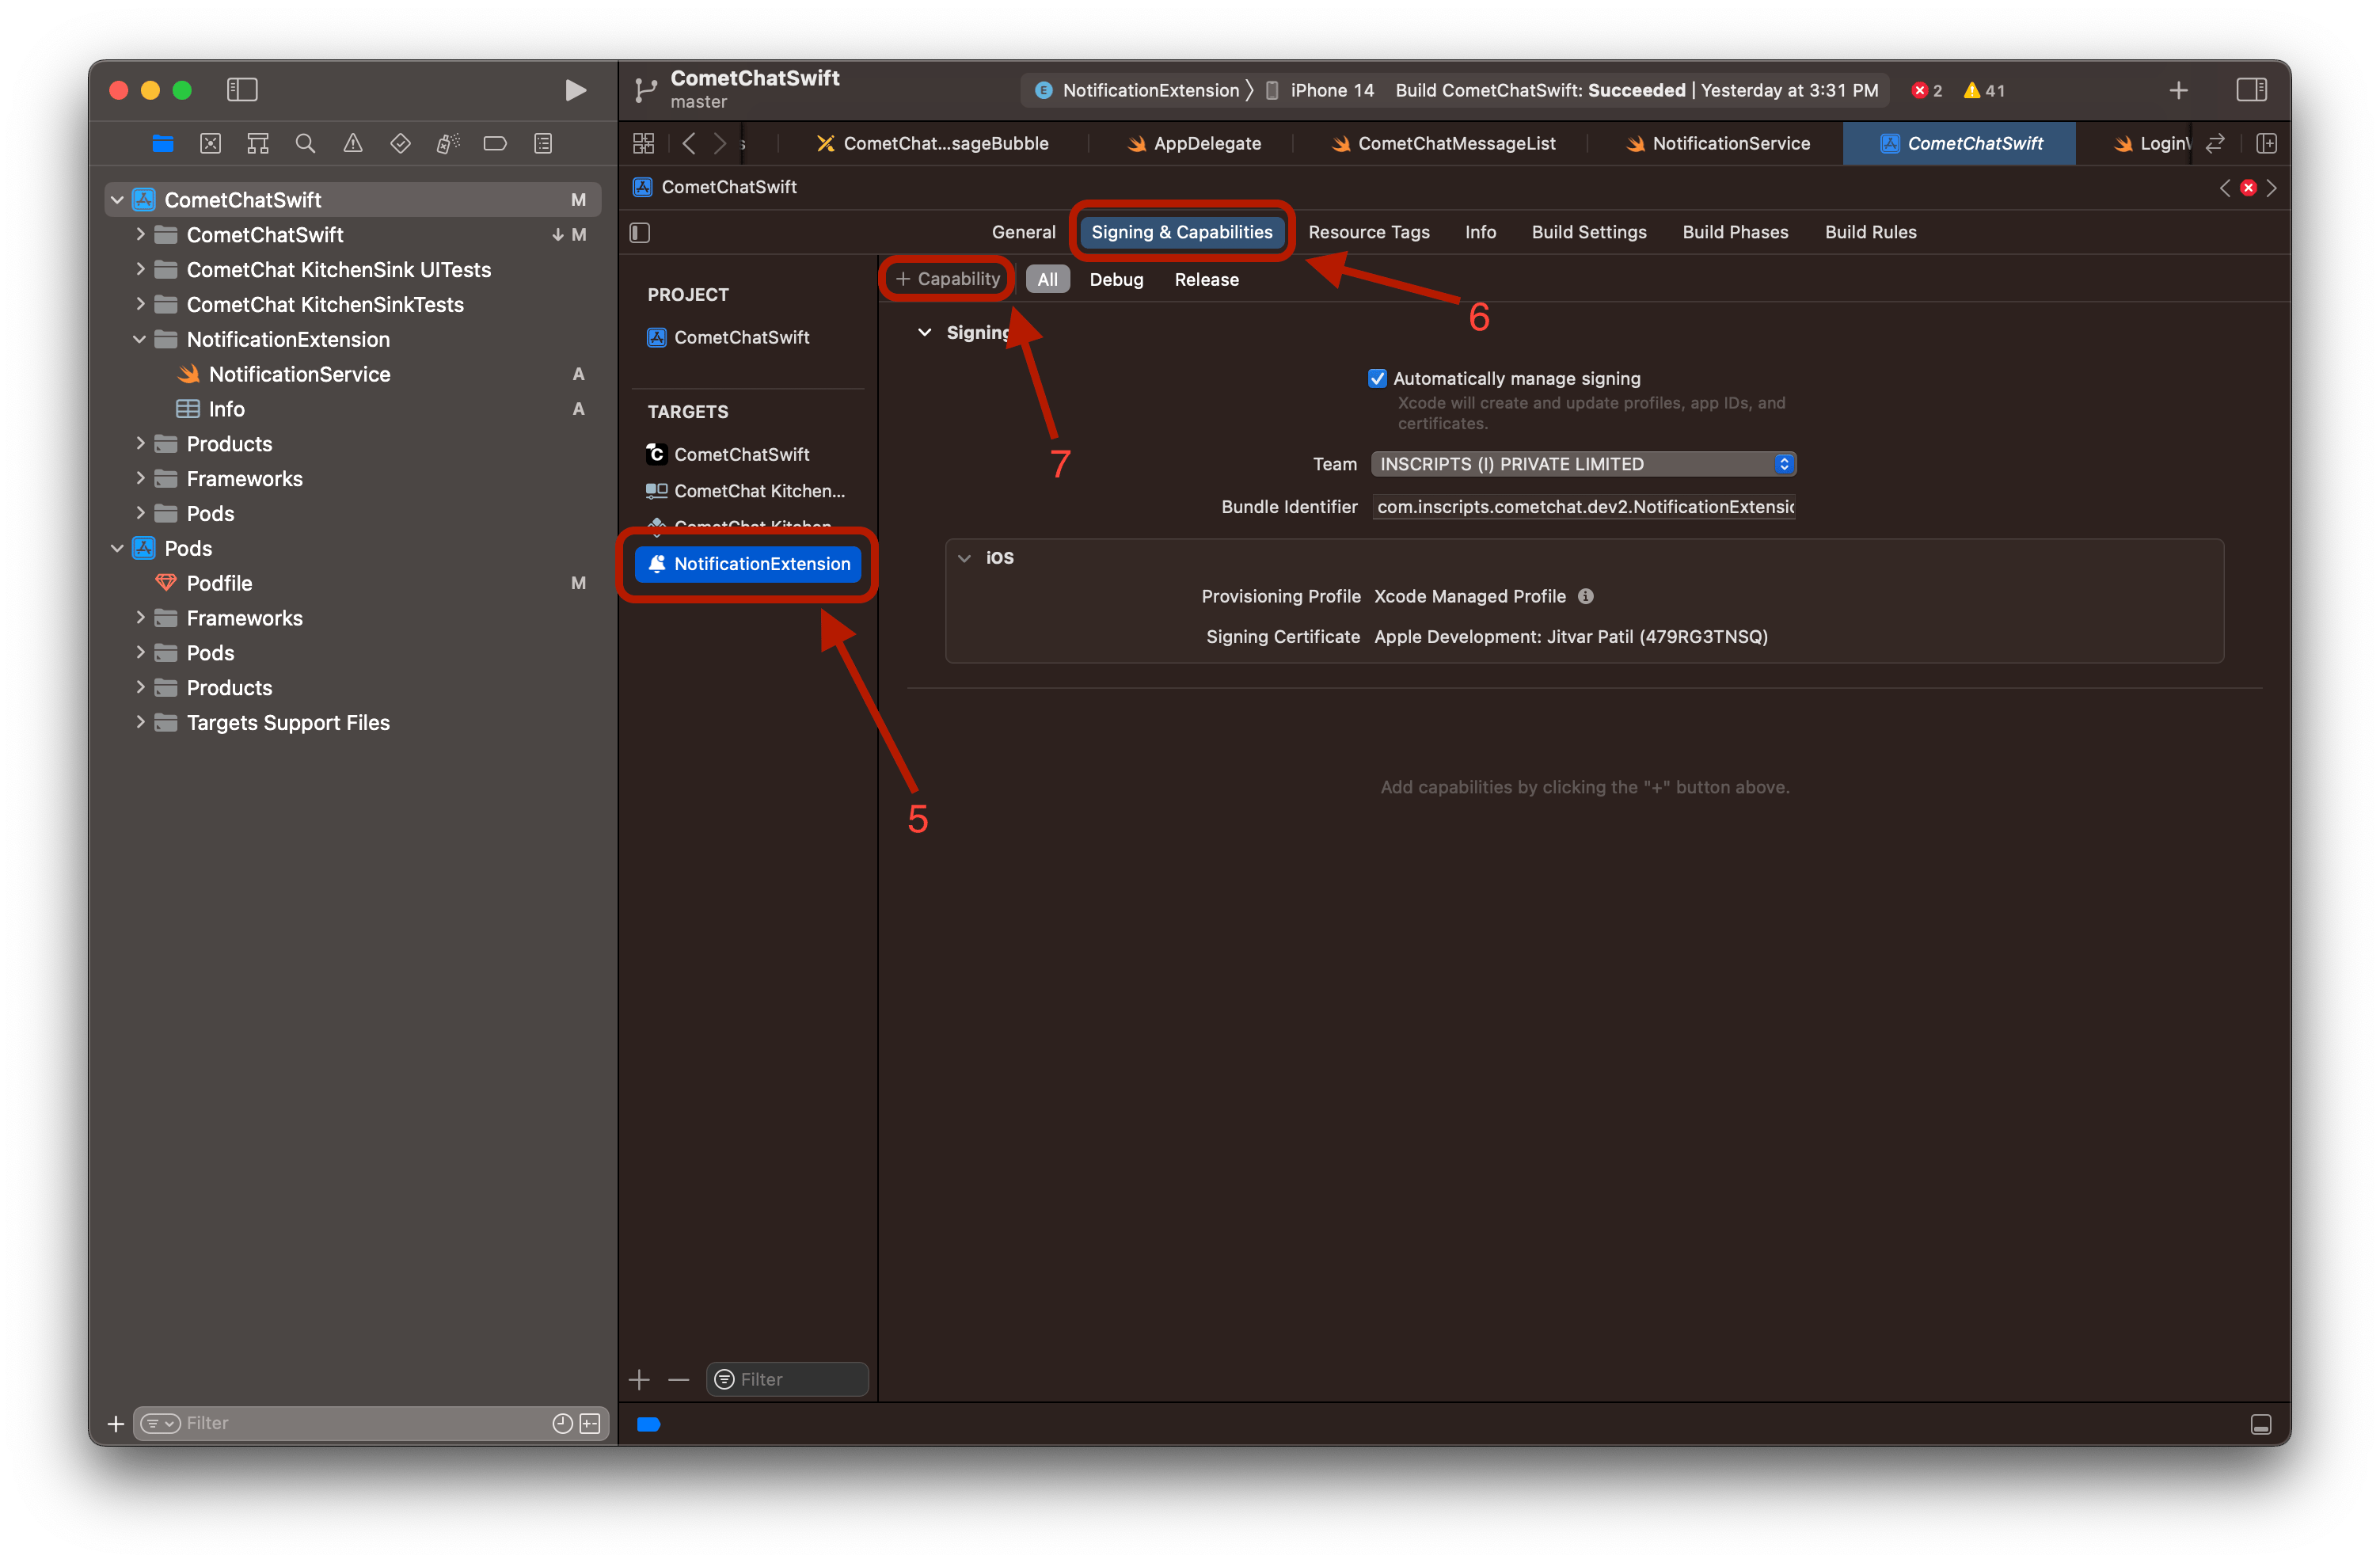 5. Then search for App Group and click on it. You can see a section of the app group section must have been added on the 'Signing & Capabilities'.
 6. Select any of the suggested app group ID or you can add your own ID by clicking on the plus icon. Till this step app group is added on the notification extension target and app group is selected.
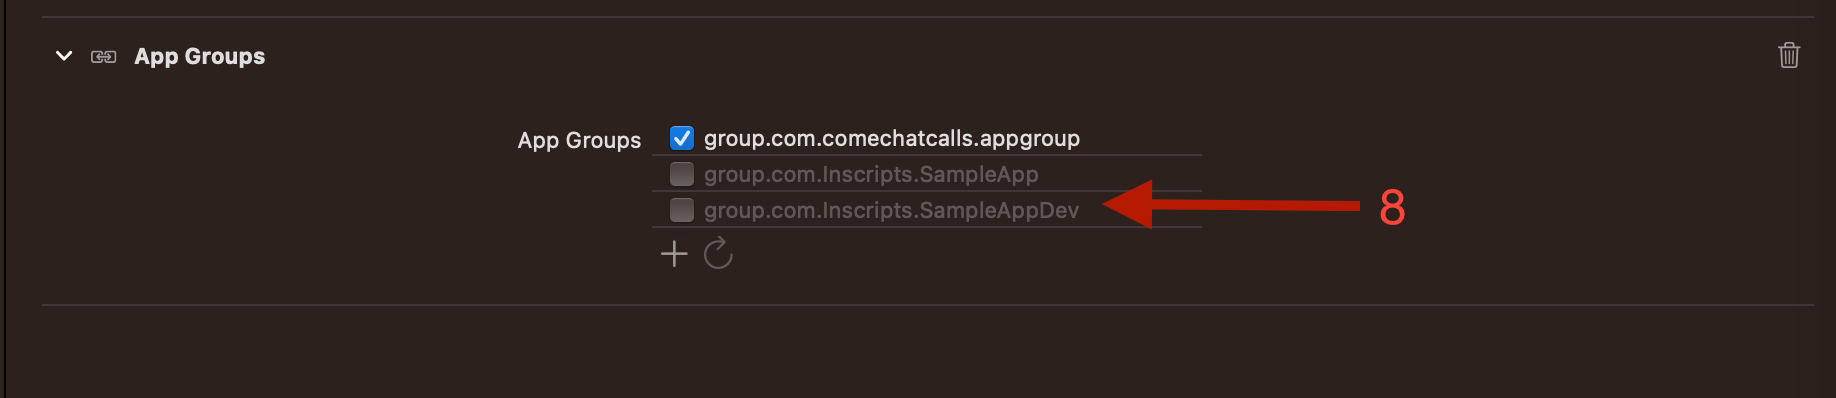 7. Now add the Capability of App Group on the main app's target as well. Repeat the same steps from step 4 for your main app target.
8. Select the same group ID that you selected on the notification extension target's app group.
Make sure the app ID is exactly the same on both the notification extension target and the main app target.
9. Lastly, add CometChatSDK in your notification extension target in the pod file.
```ruby theme={null}
# Uncomment the next line to define a global platform for your project
# platform :ios, '12.0'
target 'CometChatSwift' do
pod 'CometChatSDK', '4.1.0'
pod 'CometChatCallsSDK', '4.2.2'
end
# add your notification extension name here
target 'NotificationExtension' do
pod 'CometChatSDK', '4.0.67'
end
```
All the setup is done, let's see some code now.
## Code for Mark as read
1. Navigate to the CometChat initialization code in your project and add the group ID that you selected on app groups on the AppSettingsBuilder.
```swift theme={null}
let appSettings = AppSettings.AppSettingsBuilder()
.subscribePresenceForAllUsers()
.setRegion(region: Constants.region)
.setExtensionGroupID(id: "group.com.comechatcalls.appgroup") //add you app group ID here
.build()
```
2. Navigate to your notification extension group and open its swift file.
3. Import CometChatSDK and call these 2 functions in the `didReceive(_:withContentHandler:)` function.
```swift theme={null}
override func didReceive(_ request: UNNotificationRequest, withContentHandler contentHandler: @escaping (UNNotificationContent) -> Void) {
self.contentHandler = contentHandler
bestAttemptContent = (request.content.mutableCopy() as? UNMutableNotificationContent)
CometChat.setExtensionGroupID(id: "group.com.comechatcalls.appgroup") //add you group id
if let bestAttemptContent = bestAttemptContent {
CometChat.markAsDelivered(withNotificationPayload: bestAttemptContent.userInfo) //send the payload here
contentHandler(bestAttemptContent)
}
}
```
Run your notification extension by selecting the notification extension target from the run target on the top.
7. Now add the Capability of App Group on the main app's target as well. Repeat the same steps from step 4 for your main app target.
8. Select the same group ID that you selected on the notification extension target's app group.
Make sure the app ID is exactly the same on both the notification extension target and the main app target.
9. Lastly, add CometChatSDK in your notification extension target in the pod file.
```ruby theme={null}
# Uncomment the next line to define a global platform for your project
# platform :ios, '12.0'
target 'CometChatSwift' do
pod 'CometChatSDK', '4.1.0'
pod 'CometChatCallsSDK', '4.2.2'
end
# add your notification extension name here
target 'NotificationExtension' do
pod 'CometChatSDK', '4.0.67'
end
```
All the setup is done, let's see some code now.
## Code for Mark as read
1. Navigate to the CometChat initialization code in your project and add the group ID that you selected on app groups on the AppSettingsBuilder.
```swift theme={null}
let appSettings = AppSettings.AppSettingsBuilder()
.subscribePresenceForAllUsers()
.setRegion(region: Constants.region)
.setExtensionGroupID(id: "group.com.comechatcalls.appgroup") //add you app group ID here
.build()
```
2. Navigate to your notification extension group and open its swift file.
3. Import CometChatSDK and call these 2 functions in the `didReceive(_:withContentHandler:)` function.
```swift theme={null}
override func didReceive(_ request: UNNotificationRequest, withContentHandler contentHandler: @escaping (UNNotificationContent) -> Void) {
self.contentHandler = contentHandler
bestAttemptContent = (request.content.mutableCopy() as? UNMutableNotificationContent)
CometChat.setExtensionGroupID(id: "group.com.comechatcalls.appgroup") //add you group id
if let bestAttemptContent = bestAttemptContent {
CometChat.markAsDelivered(withNotificationPayload: bestAttemptContent.userInfo) //send the payload here
contentHandler(bestAttemptContent)
}
}
```
Run your notification extension by selecting the notification extension target from the run target on the top.
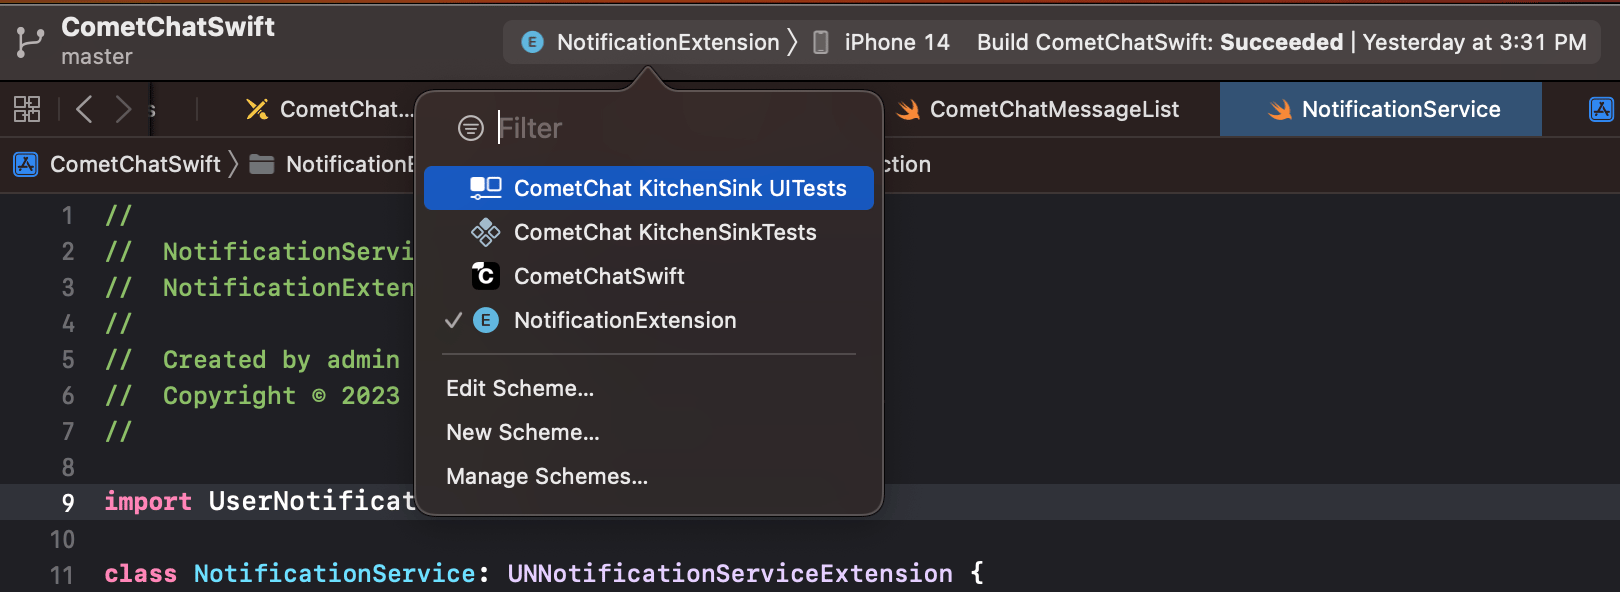 Run the main app target first and make sure you are receiving notifications there. And then run the notification extension target.
***
## Next Steps
Mark messages as delivered and read
Set up push notifications for your iOS app
Update app icon badge from push notifications
Programmatically remove delivered notifications
Run the main app target first and make sure you are receiving notifications there. And then run the notification extension target.
***
## Next Steps
Mark messages as delivered and read
Set up push notifications for your iOS app
Update app icon badge from push notifications
Programmatically remove delivered notifications